How to Check if Google Consent Mode v2 is Enabled: A Quick Guide
Google Consent Mode v2 has become a crucial tool for managing user consent and data privacy in the digital marketing landscape. As online privacy regulations continue to evolve, it’s essential to ensure your website complies with these standards while still delivering personalized experiences to your users. Understanding how to check if Google Consent Mode v2 is enabled on your site is key to maintaining this balance.
In this guide, you’ll learn how to check if Google Consent Mode v2 is active on your website. We’ll walk you through the process of verifying its status using Google Tag Manager, inspecting the data layer, and confirming its implementation in Google Analytics 4. By the end of this article, you’ll have the knowledge to confirm that your consent mode setup is working correctly, helping you to respect user privacy while optimizing your marketing efforts.

Understanding Google Consent Mode v2
Google Consent Mode v2 is an updated version of Google’s privacy management tool designed to help digital marketers navigate the complexities of protecting user data while maintaining effective marketing strategies. This tool allows websites to adjust how Google tags behave based on user consent choices, ensuring compliance with data privacy regulations such as the General Data Protection Regulation (GDPR) and the Digital Markets Act (DMA).
What is Google Consent Mode v2?
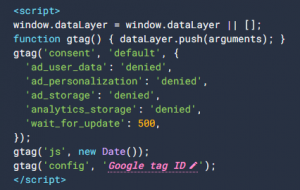
Google Consent Mode v2 is an enhanced version of the original Consent Mode, introduced in 2020. It enables the communication of cookie consent choices from visitors to Google tags, which help measure the performance of digital channels and advertising. The v2 update aligns with the new Digital Markets Act that went into effect in March 2024, introducing additional consent types and more granular control over data collection and usage.
Key components of Google Consent Mode v2 include:
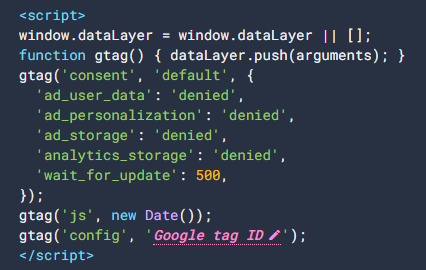
- ad_storage: Controls the storage of user’s personal data for advertising.
- analytics_storage: Manages the storage of data for analytics.
- ad_user_data: Pertains to the collection and usage of user data for advertising.
- ad_personalization: Allows the use of user data to personalize ads.
These components work together to ensure that Google’s services operate in accordance with user consent preferences, also providing a balance between data collection and privacy protection.
Why is it important?
The importance of Google Consent Mode v2 cannot be overstated in today’s digital landscape. Here are some key reasons why it matters:
- Regulatory Compliance: Implementing Consent Mode v2 is crucial for businesses to adhere to strict data privacy regulations like GDPR and DMA. This helps avoid potential legal issues and hefty fines.
- Enhanced User Privacy: By empowering users to control their consent preferences, Consent Mode v2 fosters trust and demonstrates a commitment to ethical data practices.
- Improved Marketing Performance: Despite respecting user preferences, Consent Mode v2 allows for more effective marketing campaigns by providing modeled data for users who haven’t given consent.
- Data Modeling: One of the biggest advantages of Google Consent Mode v2 is its ability to model conversions using a combination of machine learning and consented signals from other users. This helps fill reporting gaps even when users don’t consent to tracking.
- Mandatory Implementation: For businesses running Google Ads or earning advertising revenue via AdSense in the European Economic Area and the UK, implementing Consent Mode v2 is now mandatory.
By embracing Google Consent Mode v2, businesses can build trust, improve user experiences, and drive meaningful engagement while ensuring compliance with privacy regulations. It represents a significant step forward in aligning data analytics and advertising efforts with the strict demands of user consent and privacy regulations.
Checking via Google Tag Manager
Google Tag Manager (GTM) provides a powerful way to verify if Google Consent Mode v2 is enabled on your website. By using the preview mode, you can examine the consent settings and ensure they are correctly implemented. Let’s walk through the process step by step.

Accessing the Preview mode
To begin, you need to access the preview mode in Google Tag Manager. Here’s how:
- Go to https://tagmanager.google.com and sign in to your Google Account.
- Open the Tag Manager container you want to check.
- In the Workspace tab, click “Preview” in the top right corner.
- A new tab will open with Google Tag Assistant. Enter your site’s URL and click “Connect.”
- Your site will open in a new window, displaying “Connected” in the bottom right corner.
- Return to the Tag Assistant tab and click “Continue” to access the debug interface.
Examining the Consent tab
Once in preview mode, you can examine the Consent tab to verify the implementation of Google Consent Mode v2. Follow these steps:
- In the Tag Assistant debug interface, locate and select the “Consent” tab.
- Look for the “On-page Defaults” section. This area displays the initial consent settings.
- Verify that the following parameters are present and correctly set:
- ad_storage
- analytics_storage
- ad_personalization
- ad_user_data
These parameters indicate that Consent Mode v2 is active on your site.
Verifying default and update states
To ensure Consent Mode v2 is functioning correctly, you need to check both the default and update states:
- In the Summary column on the left, find the first Consent event on the page.
- Open the API call to see the consent default settings. These might be set to “denied” or “granted.”
- Look for the next Consent event in the left sidebar. This typically represents the consent update after your Consent Management Platform (CMP) has loaded.
- Examine the API call for this event to see if consent has been updated based on user choices.
If you notice any issues, such as tags firing before consent is set, you may need to adjust the order in which your tags fire. All tihngs considered, ensure that the “Consent Default” appears as early as possible, ideally before the Initialization event.
By thoroughly checking these aspects in Google Tag Manager’s preview mode, you can confirm that Google Consent Mode v2 is correctly implemented on your website. This process helps ensure compliance with privacy regulations while maintaining effective data collection for your marketing efforts.
Inspecting the Data Layer
Inspecting the data layer is a crucial step in verifying the implementation of Google Consent Mode v2 on your website. This method allows you to examine the consent settings and ensure they are correctly configured. Let’s explore how to use browser console commands, interpret the dataLayer output, and compare consent states before and after user interaction.

Using browser console commands
To inspect the data layer, you can use your browser’s console. Here’s how to do it:
- Open your website in an incognito or private browsing window to ensure a clean slate.
- Right-click on the page and select “Inspect” or press F12 to open the developer tools.
- Navigate to the Console tab in the developer tools panel.
- Type “dataLayer” (without quotes) into the console and press Enter.
This command will display the contents of the data layer, including information about Google Consent Mode v2.
Interpreting dataLayer output
When you execute the dataLayer command, you’ll see a series of objects and events. Look for entries related to consent. Here’s what to look for:
The initial consent settings, which might look like this:
{“consent”, “default”, {“ad_storage”:”denied”, “analytics_storage”:”denied”, “wait_for_update”:500}}
- This indicates the default consent state before user interaction.
After the user interacts with the consent banner, you should see an updated consent state:
{“consent”, “update”, {“ad_storage”:”granted”, “analytics_storage”:”granted”}}
- This shows that the user has granted consent for both advertising and analytics storage.
Before and after consent comparison
To fully understand how Google Consent Mode v2 is working on your site, it’s essential to compare the data layer before and after user consent:
- Before consent:
- Check the initial consent settings in the data layer.
- Look for “denied” states for ad_storage, analytics_storage, ad_personalization, and ad_user_data.
- After consent:
- Interact with your consent banner by accepting all cookies.
- Refresh the data layer in the console by typing “dataLayer” again.
- Look for “granted” states for the consent parameters you’ve allowed.
By comparing these states, you can verify that Google Consent Mode v2 is correctly updating based on user choices. As a result, this process helps ensure that your website respects user privacy preferences while still collecting necessary data for your marketing and analytics efforts.
Remember, proper implementation of Google Consent Mode v2, as has been noted, is crucial for compliance with privacy regulations and maintaining user trust. Regular inspection of the data layer can help you catch and resolve any issues promptly, ensuring smooth operation of your consent management system.
Verifying in Google Analytics 4
Google Analytics 4 (GA4) provides a straightforward way to verify if Google Consent Mode v2 is correctly implemented on your website. By checking the consent settings within GA4, you can ensure that your data collection aligns with user privacy preferences and regulatory requirements.

Navigating to Consent settings
To access the consent settings in GA4, follow these steps:
- Log in to your Google Analytics account and select the desired GA4 property.
- Click on “Admin” in the bottom left corner of the navigation menu.
- Under “Data collection and modification,” click on “Data streams.”
- In the list of data streams, look for any entries with an “Action required” label next to them.
If you don’t see any “Action required” labels, it may mean that you’re already sending the necessary consent signals or have a low distribution of visitors from the European Economic Area (EEA).
Interpreting consent signals
Once you’ve accessed the data stream settings, pay close attention to the “Consent settings” section. Here’s what to look for:
- Ads measurement consent signals: GA4 expects the ad_user_data consent mode parameter for ads measurement consent.
- Ads personalization consent signals: The ad_personalization consent mode parameter is used for ads personalization consent.
If you see an “Action required” label next to either of these sections, it means that GA4 isn’t receiving the necessary consent signals for that specific area. This could indicate that your Google Consent Mode v2 implementation needs adjustment.
Troubleshooting common issues
If you encounter issues with your consent mode implementation, consider the following troubleshooting steps:
- Check your consent banner: Ensure that your consent management platform (CMP) or custom consent banner is correctly configured to send the required consent signals to GA4.
- Verify tag firing: Use Google Tag Assistant to check if your tags are firing correctly based on the consent settings. This can help identify any discrepancies between user consent choices and data collection.
- Inspect the data layer: Use browser console commands to examine the dataLayer and verify that consent updates are being properly recorded and sent to GA4.
- Review implementation timing: Make sure that your consent mode implementation sets the default consent state before any tags or other code uses or updates consent.
- Check for regional adaptations: If you’ve implemented region-specific consent defaults, verify that your setup correctly adapts to different geographic locations.
Remember, it may take up to 48 hours for GA4 to detect and reflect changes in your consent signals after you update your website or app implementation. If you’ve made changes, be patient and check back after this period to see if the “Action required” labels have been resolved.
By thoroughly verifying your Google Consent Mode v2 implementation in Google Analytics 4, you can ensure that you’re respecting user privacy choices while still collecting valuable data for your marketing efforts. At this point, regular checks and troubleshooting will help maintain compliance with evolving privacy regulations and build trust with your website visitors.
Conclusion - How to check if consent mode v2 is enabled?
Checking if Google Consent Mode v2 is enabled on your website has a crucial role in maintaining user privacy and regulatory compliance. By following the methods outlined in this guide, you can ensure that your consent settings are properly implemented and functioning as intended. This process not only helps to respect user choices but also allows you to make the most of your marketing efforts while staying within legal boundaries.
LET'S START A PROJECT
In summary, regular verification of your Google Consent Mode v2 setup is key to adapting to the ever-changing digital privacy landscape. By keeping tabs on your implementation through Google Tag Manager, data layer inspection, and Google Analytics 4, you’re better equipped to handle privacy concerns and build trust with your audience. Remember, a well-implemented consent mode not only protects your users but also enhances your ability to gather valuable insights and deliver personalized experiences.
FAQs
How can I confirm that Google Consent Mode v2 is functioning correctly?
To ensure Google Consent Mode v2 is correctly implemented, check the following:
- The Consent tab in the Preview mode of Google Tag Manager.
- The default settings for Consent Mode in Google Tag Manager.
- The values registered in the dataLayer.
- The settings in Google Analytics 4.
What steps are involved in verifying the status of consent mode in Google Ads?
To check the consent mode status in Google Ads, follow these steps:
- In your Google Ads account, select the Goals icon.
- From the section menu, choose the Conversions dropdown and click Summary.
- Look at the conversion actions table and select a Google Ads website conversion action.
- At the top of the page menu, select the Diagnostics tab.
How do I know if my website is using Google Consent Mode v2?
To verify if your website is utilizing Google Consent Mode v2, open your site in incognito mode using Chrome. Right-click the webpage, select “Inspect,” navigate to the Sources tab, check the scripts, and look for consent mode parameters.
What are the steps to enable Google Consent Mode v2 on my website?
To activate Google Consent Mode v2, follow these five steps:
- Select a Google Consent Management Platform (CMP).
- Set up Google Tag Manager to handle Consent Mode.
- Configure the CMP tag.
- Debug and publish your setup.
- Ensure that built-in consent checks are verified.

